
Installation
安装
System Requirements:
- Node.js 16.14 or later.
- macOS, Windows (including WSL), and Linux are supported.
系统要求:
- Node.js 16.14以上
- 支持macOs, Windows(包含WSL(linux版的windows子系统))以及Linux
Automatic Installation
自动安装
We recommend starting a new Next.js app using create-next-app, which sets up everything automatically for you. To create a project, run:
我们建议使用create-next-app启动一个新的 Next.js 应用程序,它会自动为你设置好一切。要创建项目,请运行:
npx create-next-app@latest
On installation, you’ll see the following prompts:
在安装中,你会看到以下提示:
What is your project named? my-app
Would you like to use TypeScript? No / Yes
Would you like to use ESLint? No / Yes
Would you like to use Tailwind CSS? No / Yes
Would you like to use `src/` directory? No / Yes
Would you like to use App Router? (recommended) No / Yes
Would you like to customize the default import alias (@/*)? No / Yes
What import alias would you like configured? @/*
After the prompts, create-next-app will create a folder with your project name and install the required dependencies.
在提示之后, create-next-app 会创建一个以你项目名称命名的文件夹并且安装需要的依赖。
Good to know:
- Next.js now ships with
TypeScript,ESLint, andTailwind CSSconfiguration by default. - You can optionally use a
srcdirectory in the root of your project to separate your application’s code from configuration files.
值得一提的是:
- Next.js现在默认安装TypeScript、ESLint和Tailwind CSS配置。
- 你可以选择在项目根目录中使用src目录来将应用程序的代码与配置文件分开。
ships: 船只,默认携带或默认集成, 类比到产品交付的过程,表示这些功能在 Next.js 中已经预先包含,用户可以直接使用。
optionally: 可选择
separate: 分离
Manual Installation
手动安装
To manually create a new Next.js app, install the required packages:
要手动创建一个新的Next.js应用程序,请安装所需的软件包:
npm install next@latest react@latest react-dom@latest
Open your package.json file and add the following scripts:
打开你的package.json文件并添加以下脚本:
{
  "scripts": {
    "dev": "next dev",
    "build": "next build",
    "start": "next start",
    "lint": "next lint"
  }
}
These scripts refer to the different stages of developing an application:
这些脚本涉及开发应用程序的不同阶段:
- dev: runs next dev to start Next.js in development mode.
- build: runs next build to build the application for production usage.
- start: runs next start to start a Next.js production server.
- lint: runs next lint to set up Next.js’ built-in ESLint configuration.
Creating directories
创建目录
Next.js uses file-system routing, which means the routes in your application are determined by how you structure your files.
Next.js使用文件系统路由,这意味着应用程序中的路由是由您如何组织文件来确定的。
The app directory
For new applications, we recommend using the App Router. This router allows you to use React’s latest features and is an evolution of the Pages Router based on community feedback.
对于新应用程序,我们建议使用App Router。这个路由器允许您使用React的最新功能,是基于社区反馈演变而来的Pages Router的升级版。
evolution: 进化, 演变
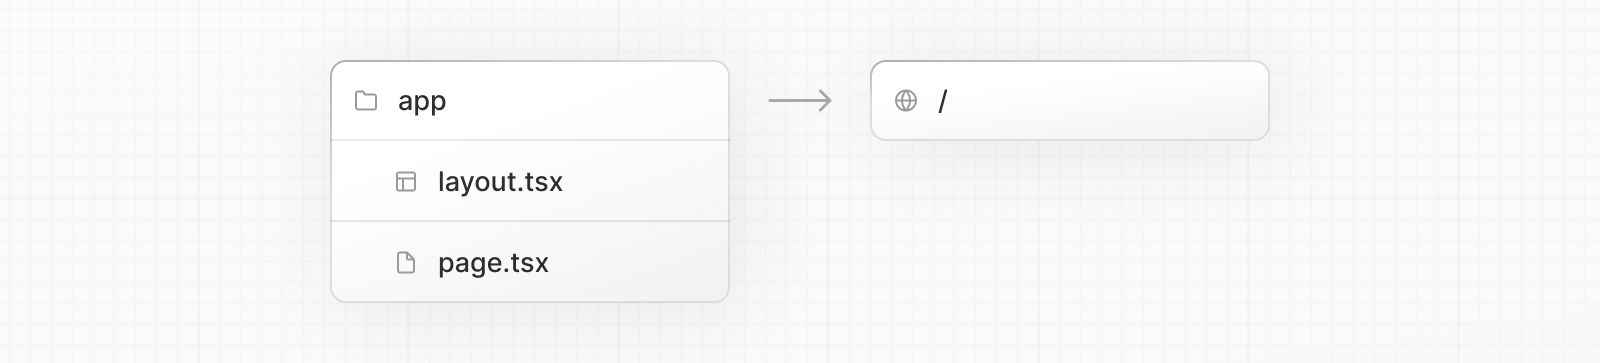
Create an app/ folder, then add a layout.tsx and page.tsx file. These will be rendered when the user visits the root of your application (/).
创建一个app/文件夹,然后添加layout.tsx和page.tsx文件。当用户访问你的应用程序的根目录(/)时,这些文件将被呈现出来。
Create a root layout inside app/layout.tsx with the required <html> and <body> tags:
在app/layout.tsx中创建一个根布局,其中包含所需的<html>和<body>标签:
export default function RootLayout({
  children,
}: {
  children: React.ReactNode
}) {
  return (
    <html lang="en">
      <body>{children}</body>
    </html>
  )
}
Finally, create a home page app/page.tsx with some initial content:
最后,创建一个带有一些初始内容的主页app/page.tsx:
export default function Page() {
  return <h1>Hello, Next.js!</h1>
}
Good to know: If you forget to create layout.tsx, Next.js will automatically create this file when running the development server with next dev.
值得一提的是:如果你忘记了创建layout.tsx文件,Next.js会在使用next dev运行开发服务时自动的创建它。
Learn more about using the App Router.
了解有关使用应用程序路由器的更多信息。
The pages directory (optional)
If you prefer to use the Pages Router instead of the App Router, you can create a pages/ directory at the root of your project.
如果你喜欢使用 Pages Router 而非 App Router,你可以在项目的根目录下创建一个 pages/ 目录
Then, add an index.tsx file inside your pages folder. This will be your home page (/):
然后,在你的 pages 文件夹中添加一个 index.tsx 文件。这将成为你的主页 (/)
pages/index.tsx
export default function Page() {
  return <h1>Hello, Next.js!</h1>
}
Next, add an _app.tsx file inside pages/ to define the global layout. Learn more about the custom App file.
接下来,接下来,在 pages/ 目录下添加一个 _app.tsx 文件来定义全局布局。了解更多关于custom App file.
pages/_app.tsx
import type { AppProps } from 'next/app'

export default function App({ Component, pageProps }: AppProps) {
  return <Component {...pageProps} />
}
Finally, add a _document.tsx file inside pages/ to control the initial response from the server. Learn more about the custom Document file.
最后,在 pages/ 目录下添加 _document.tsx 文件,以控制服务器的初始响应。了解更多有关自定义文档文件的信息。
pages/_document.tsx
import { Html, Head, Main, NextScript } from 'next/document'

export default function Document() {
  return (
    <Html>
      <Head />
      <body>
        <Main />
        <NextScript />
      </body>
    </Html>
  )
}
Learn more about using the Pages Router.
Good to know: Although you can use both routers in the same project, routes in app will be prioritized over pages. We recommend using only one router in your new project to avoid confusion.
需要注意:虽然你能在同一个项目中使用两种路由器,但是app路由器优先级会高于page路由器,我们建议在你的新项目中仅使用一个路由器,以避免混淆。
confusion:混乱
The public folder (optional)
Create a public folder to store static assets such as images, fonts, etc. Files inside public directory can then be referenced by your code starting from the base URL (/).
创建一个公共文件夹来存储静态资源,如图片、字体等。在公共文件夹中的文件可以在代码中通过从基本URL (/) 开始进行引用。
assets: 资产
Run the Development Server
运行开发服务
-
Run
npm run devto start the development server. -
Visit http://localhost:3000 to view your application.
-
Edit
app/layout.tsx(orpages/index.tsx) file and save it to see the updated result in your browser. -
运行
npm run dev来启动开发服务器。 -
访问 http://localhost:3000 来查看你的应用程序。
-
编辑
app/layout.tsx(或pages/index.tsx)文件并保存, 在浏览器中查看更新的结果